If your Chamberlain garage door opener has stopped behaving, start simple. Power cycle the unit, check the tracks for debris, and make sure the safety sensors are facing each other. That short checklist solves a surprising number of issues. If the problem sticks around, verify the outlet, test the wall control, and try a fresh battery in the remote. You can also pull the emergency release handle, then lift the door by hand to see if the door itself moves freely. If it glides, your opener is the likely culprit. If it binds, you have a door or track problem to correct first.
I know that sounds almost too easy, but it is where I would start at home too. Perhaps you will feel a little skeptical, I sometimes do, still, these steps prevent you from chasing ghosts. Chamberlain openers are pretty forgiving, and their diagnostics usually point you in the right direction if you pay attention to the blink codes and sensor LEDs. Chamberlain’s own support notes that flashing lights often indicate safety sensor or wiring issues, which is why this guide keeps returning to sensor alignment and wiring sanity checks, again and again, for good reason.
Power cycle the opener, the three minute refresh
Unplug the opener from the ceiling outlet. Wait a full 60 to 180 seconds. Plug it back in, then try the wall control. Power cycling clears temporary logic faults and is harmless. If lights flash immediately or the door moves a few inches then reverses, take note of any blink patterns on the motor unit because those patterns are your next breadcrumb. Chamberlain explains that flashing lights often link to safety reversal problems, typically sensors or wiring.
Quick checks while you wait
Confirm the outlet actually has power by plugging in a phone charger.
If it is dead, check the breaker or GFCI. A tripped GFCI in the garage can quietly disable the opener and nothing else. General home repair sources call out this exact failure mode, and it is common.
Clear obstructions and clean the tracks, a two minute habit
Wipe the vertical tracks with a dry cloth. Remove leaves, grit, screws, or hardened grease. Rollers can seize or chatter, which tricks the opener into thinking it hit an obstacle. Lubricate metal rollers and hinges with a silicone or white lithium product, sparingly. If the door binds mid travel, address that first. A door that is stiff can cause reversal or travel limit confusion. General troubleshooting guides emphasize that sticky rollers or misaligned tracks can stop travel early.
Try the hand test
Pull the red emergency release when the door is closed. Lift the door halfway and let go, carefully. A balanced door stays in place or drifts slightly. If it slams down or rockets up, spring tension is off. Do not adjust torsion springs yourself. Call a pro, since springs store dangerous energy. If you need same day help, our emergency garage door repair service covers exactly this.
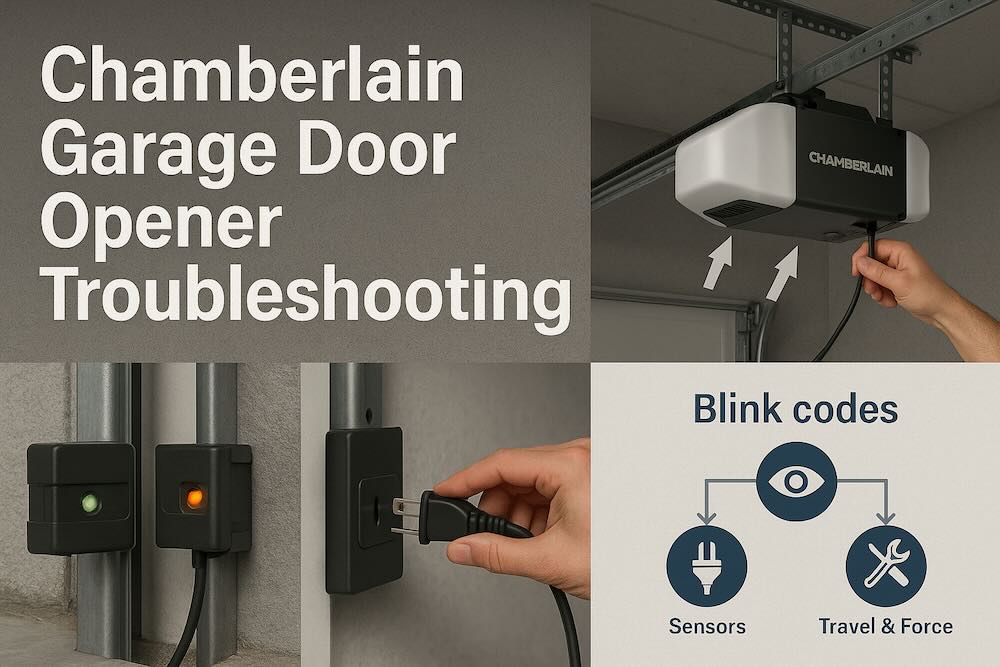
Inspect and align the safety sensors, the number one fix
Look at the two photo eyes near the floor. On most Chamberlain models, one sensor shows solid amber, the other shows solid green when aligned and clear. If one LED is off or flickering, alignment or obstruction is likely. Wipe the lenses, aim the sensors directly at each other, and snug the brackets. Chamberlain’s support articles outline that a flicker or off LED on the receiving sensor points to misalignment or obstruction, and that wiring faults can trigger diagnostic codes too.
Tiny details that matter
Keep the beam path free of garden tools, tires, or even spider webs.
Make very small adjustments, then recheck the LED status.
Inspect the thin low voltage wires for staples through insulation or chew marks near the floor. If you see bare copper, that can cause intermittent reversals or random cycling, which other home guides warn about.
If you keep seeing reversals and blinking even after alignment, there may be a wire break or reversed polarity at the sensor screws. Some third party resources summarize typical blink meanings, like one to four blinks mapping to sensor wiring or alignment problems, though exact patterns depend on model. Always confirm with your specific manual.
Prefer a technician to trace wiring, book a garage door opener repair visit. We also handle rewiring and sensor replacement if needed.
Verify power, wall control, and remote batteries
If the wall control works but the remote does not, replace the coin cell battery in the remote. If neither works, suspect power or lock mode. Some Chamberlain wall controls can enter a lock mode that disables remotes while still allowing the wall button. A slow blinking wall control can also point to wiring issues at the wall control itself. Troubleshooting resources specifically call out blinking wall controls as a wiring or unit fault sign.
Wall control sanity check
Remove the wall control from the wall.
Inspect the two wires. Tighten the screws. Make sure no stray strand bridges the terminals.
At the opener, reseat the two wall control wires on the correct terminals.
If the outlet has power and the unit is still completely dead, you may have a failed logic board or a blown internal fuse. At that point, it is worth getting an estimate, especially if your opener is over a decade old.
Disconnect the door and test free travel
Pull the emergency release with the door down. Move the door by hand. If the door is smooth and balanced, reconnect the trolley by running the opener or pulling the handle toward the opener until it clicks back in. If the door feels heavy, noisy, or lurches, fix the door first. Sensors and electronics cannot overcome a door with friction or imbalance.
I will be honest, I sometimes hope the issue is the opener, because electronics are easier to swap than a bent track. But a door that drags will beat up a brand new opener as quickly as the old one. So, this step matters.
Read the diagnostic blink code, then act
Most Chamberlain units communicate through blink patterns on the motor housing or the up and down arrow LEDs. Typical meanings include sensor wiring errors, misalignment, and similar safety faults. The exact chart varies by model, and Chamberlain’s official pages are the place to confirm patterns. If you see repeated blinks while the lights flash 10 times, suspect a safety reversal condition and return to sensor alignment and wiring checks.
Some third party summaries indicate single to quadruple blinks mapping to sensor wiring, reversed wires, misalignment, or slight misalignment. Treat those as directional hints, then verify with your opener’s label or manual.
Helpful note for myQ users
If you use a myQ Smart Garage Control or Smart Garage Hub, test the door sensor battery. The official manual describes a simple press and beep test that can surface a low battery, which can confuse status feedback.
| Symptom | Likely Cause | Fast Fix | When to Call a Pro |
|---|---|---|---|
| Door will not close, opener lights flash repeatedly | Safety sensors blocked, misaligned, or wiring fault | Clean lenses, align until LEDs are solid green and amber, inspect low voltage wires | If LEDs never go solid or wires are damaged |
| Remote works sometimes, wall control always works | Weak coin cell battery, interference, or lock mode | Replace battery, toggle lock mode off, reprogram remote | If remotes fail after fresh battery and reprogram |
| Door starts down, reverses after 6 to 12 inches | Obstruction or stiff door causing force limit reversal | Clear tracks, lubricate rollers, hand test balance | If door fails the balance test or track is bent |
| No power, unit dark | Dead outlet, tripped GFCI, failed logic board | Check outlet and breaker or GFCI, then power cycle | If outlet is live but unit stays dead |
Set travel limits and force, tiny tweaks that fix big headaches
If the door hits the floor then backs up, or it stops a little short at the top, your travel limits likely need a nudge. Think of travel limits as the end points that tell the opener where to stop. Force is different. Force tells the opener how much effort is allowed before it decides something is wrong and reverses to protect you. I like to separate them in my head, distance versus effort, otherwise it gets muddled.
On most Chamberlain units, you will either have electronic up and down buttons or manual adjustment screws. The official guidance is very consistent, make small changes, test, then repeat. If the door does not open at least five feet, increase the up force a little, clockwise. If it slams or bounces, you went too far. Back it off and retest.
A quick way to avoid confusion is to set travel before force. First, dial in how far the door should move. Second, help the opener learn how hard it may push or pull. The diagnostic LED will complain if it senses too much force or if travel is so wrong that safety logic triggers. Chamberlain’s pages remind you that blink patterns are there to guide you, so do not ignore them.
Simple method, electronic buttons
Press and hold the set or learn button until the up arrow flashes.
Tap the up arrow to move the door to the fully open position.
Press set to lock that position.
Tap the down arrow to send the door down to the closed position.
Press set again. The opener will run a short test. If it reverses at the floor, you may need a slight down travel decrease or a small increase in down force. Check your manual for your exact button names, since models differ.
Simple method, manual screws
Locate the up and down travel screws on the motor housing.
Turn the up travel screw a quarter turn to increase the open height.
Turn the down travel screw a quarter turn to reduce how hard the door pushes into the floor seal.
Test after each small turn. The goal is a smooth stop at both ends.
Some older models hide the cams behind small holes on the housing. A flathead screwdriver moves those cams. It is less common today, still, if you have a vintage unit that sounds familiar.
Safety nudge
If the door fails the hand balance test, do not keep cranking force higher. Fix the door first. For professional help, use our garage door repair or book a maintenance service if you want a full tune up with a spring and cable check.
Program remotes and keypads, plus the sneaky lock mode
After you adjust travel and force, it is smart to re sync your remotes and the wireless keypad. The process is usually press the learn button once, then press and hold the remote button until the light blinks. Keypads have a short sequence where you enter a PIN, then press a function key. Chamberlain’s programming hub and step by step article cover the variations. The golden rule is this, find the learn button first, yellow or purple or another color depending on age, then follow your specific steps.
If the wall control works but remotes will not, check for lock mode. Some wall consoles can disable remote operation temporarily. It is easy to enable by accident while cleaning the button. A blinking wall console is a classic clue. Toggle the lock option off, then try your remotes again. Chamberlain’s diagnostic pages keep steering you back to indicators, for good reason.
Quick reprogram checklist
Replace the coin cell in the remote first, cheap and fast.
Clear old codes only if you lost a remote or you suspect interference.
Reprogram remotes one by one, then do the keypad last.
If the opener was factory reset during a myQ fix, your remotes may be cleared. Re add them after Wi Fi setup. The order matters less than doing both completely. That prevents the half working state that causes confusion.
Belt or chain drive care, quiet now means fewer problems later
Belt drive Chamberlain units are quiet and usually low maintenance. Still, a quick visual helps. Look for fraying, glazing, or uneven tension. Chain drives should not sag like a jump rope. A slight bow is fine. Too tight is also a problem, it can stress the sprocket and the motor shaft. A quick half turn on the tension nut is often all it needs. If you are unsure, leave it slightly loose rather than guitar string tight.
Also inspect the trolley and the door arm connection. A wallop from a car bumper can bend that arm. Small bends create squeaks and false reversals. A squeak does not always mean trouble, but when it appears with stalls or flashing lights, follow the diagnostics and do the simple travel and force retune.
While you are there, check the header bracket above the door. It takes a lot of load. Loose lag screws let the opener shake the wall, which you will hear as a thump at starts and stops.
myQ connectivity, fix the Wi Fi before you blame the opener
If your door works from the wall button and remotes but the app is flaky, isolate Wi Fi. Start by putting the opener in Wi Fi setup mode, usually by pressing and releasing the yellow learn button two or three times. You should see or hear a cue, then connect to the temporary MyQ network and finish the setup. Chamberlain’s support has a full walkthrough, including 2.4 GHz recommendations and what to do if the app stalls.
A few practical tips that come up again and again, move the router a little closer if you can, separate SSIDs for 2.4 and 5 GHz to avoid band steering issues, and make sure your phone stays on the temporary MyQ network long enough to hand off credentials. If you use a Smart Garage Hub, test the door sensor battery. A weak sensor battery can confuse status, even when Wi Fi is fine.
If you went nuclear with a full factory reset, remember to reprogram your remotes and keypad afterward. People often think the reset failed because the door still moves from the wall control, but that is normal. You only cleared wireless credentials. Re add them in a minute.
Common blink codes, what they suggest, what you do next
Every model family has its own matrix, so always cross check your manual or the official table. The principle is the same. Count the blinks between pauses, look up the meaning, then go to the targeted step. Chamberlain states that the diagnostic LED next to the learn button flashes a number of times, pauses, then repeats, which points at a likely issue, often the safety sensors or their wiring.
| Blink Pattern | What It Often Means | What To Try First | Next Step |
|---|---|---|---|
| 1 blink then pause | Sensor wires shorted or disconnected | Inspect low voltage wires at sensors and head unit, repair damage | Re align sensors until LEDs are solid |
| 4 blinks then pause | Sensors misaligned or obstructed | Clean lenses, remove objects, fine tune alignment | Replace a failed sensor if LEDs never go solid |
| 5 blinks then pause | Motor overheated or similar protection | Let it cool, check for binding door, verify travel and force | If repeats, call for diagnosis |
| Lights flash 10 times when closing | Safety reversal triggered | Return to sensor checks and wiring inspection | Test door balance and track alignment |
Keypad glitches, simple cures before you replace it
Keypads take a beating from weather. Before you assume it is dead, pop in a fresh battery and reprogram after you confirm the opener itself is happy. If the keypad wakes and the backlight glows but the door will not move, check that remotes work. If remotes fail too, you are likely in lock mode or you cleared memory during a reset. Program one remote, then attempt keypad pairing again. Chamberlain’s remote programming page applies to most keypads as well since both use the learn button flow.
A little housekeeping helps, clean the rubber keys with a barely damp cloth and let it dry fully. Corrosion at the battery contacts is a common surprise. If you see white powder, gently clean it. If it returns quickly, consider a replacement keypad and a weather shield.
Troubleshooting recipes, quick copy blocks for your CMS
You can paste these as expandable accordions or a mini FAQ.
Door starts down, reverses after a foot
Likely obstruction or force limit too low. Clean tracks, lubricate rollers, hand test balance, then add a small down force increase. If lights flash repeatedly, sensors need alignment.
Remote works at five feet but not at the driveway
New battery first. Reprogram remote. Check for LED bulbs that create interference. Some cheap bulbs do that. If the wall control is on lock mode, remotes will seem dead. Toggle it.
myQ shows door open when it is closed
Verify the door sensor battery on Smart Garage Hub setups, then redo Wi Fi setup. Confirm you used the 2.4 GHz network.
Opener hums, then stops
Could be a jammed door or a capacitor or motor issue. Disconnect the door. If the motor runs freely without the load, fix the door first. If the motor still struggles, schedule diagnosis.
Comparison table, belt vs chain vs direct drive, what to expect
| Drive Type | Noise | Maintenance | Typical Fixes | When to Replace |
|---|---|---|---|---|
| Belt drive | Very quiet | Visual belt check, pulley alignment | Travel and force tune, belt tension tweak | Cracked belt or repeated logic faults |
| Chain drive | Moderate to loud | Chain tension, sprocket wear | Tension adjust, sprocket and gear check | Severe gear wear or cracked rail |
| Direct drive | Quiet | Minimal | Mostly electronics and travel settings | Out of warranty board or motor failure |
Mini checklist before you call a technician
Power cycle and confirm the outlet or GFCI.
Clean tracks and align sensors until the LEDs go solid.
Set travel, then fine tune force with tiny moves.
Reprogram remotes and keypad, verify lock mode is off.
If blink codes persist, match the pattern to your manual and act on that exact hint.
FAQ
Why does my Chamberlain opener click but not move the door
Usually power is present, the logic board wakes, but the motor is not driving. First, pull the emergency release with the door down and move the door by hand. If the door sticks, fix the door. If the door moves smoothly, look at the opener. Listen for a humming motor that stops after a second. That can point to a start capacitor or internal drive issue. Quick try, power cycle, reseat the wall control wires at the head unit, then test one remote after replacing its battery. If none of that helps, it is time for diagnosis.
My opener lights flash ten times and it will not close
Treat this as a safety sensor problem first. Clean both lenses. Align until you get a steady green on the receiver and steady amber on the sender. Check the low voltage wires near the floor for damage, even a small nick. If you still get flashing, reduce glare from sunlight with a small shade or reposition slightly, then try again.
The remote only works inside the garage
Replace the coin cell battery. That really is the most common fix. Then reprogram the remote with the learn button. If range is still poor, check for interference sources like certain LED bulbs in the opener or garage fixtures. Swap one bulb at a time and test. It feels silly, yet it solves range issues more often than you would expect.
The wall control blinks and nothing responds
You might be in lock mode. Many Chamberlain wall consoles have a lock function that disables remotes. Press and hold the lock button for a few seconds to toggle it. If the blink persists, remove the wall control, trim and reterminate the wires, and reseat the wires at the opener.
Door closes fully, then pops back open an inch or two
Two likely causes. The down travel is set a bit long, so the door hits the floor seal and rebounds. Or the force setting is too low, so vibration at the stop point triggers a safety reversal. Shorten the down travel slightly, then add a tiny amount of down force. Test in small steps.
Can I bypass the safety sensors just to get the door down once
No, it is not a good habit and it increases risk. You can hold the wall button to force close on some models as a temporary measure, but only if you see the full path and are certain it is clear. Better, align the sensors and fix the wiring.
How often should I lubricate rollers and hinges
Lightly every six months in a typical climate. Wipe the tracks clean first, then a small amount of silicone or white lithium on metal rollers and hinges. Avoid getting lubricant on the belt. Nylon rollers with sealed bearings need very little. If the door squeaks loudly after lubrication, that is a flag for misalignment, not just dryness.
The chain sags, is that bad
A small sag is normal. A big U shape is not. Tighten the chain a half turn to start, then recheck. Over tightening stresses the sprocket and motor shaft, so aim for modest tension. Belts should be taut with minimal flex when pressed at the midpoint.
The opener behaves after a reset, then fails again next week
This pattern usually means you are clearing symptoms, not causes. Focus on door balance, sensor wiring, and the power source. A wall outlet with a loose neutral or a GFCI that trips intermittently can create repeating ghost problems. If you want it checked end to end, our garage door maintenance service is designed for exactly that, a preventative tune up.
When is replacement smarter than repair
If the motor or logic board fails on an older unit, parts may rival the cost of a modern opener with better safety and myQ features. If you are spending more than half the price of a new opener on a repair, or you have repeated failures, pricing a replacement makes sense.
Maintenance schedule, what to do and when
| Interval | Task | How To | Notes |
|---|---|---|---|
| Monthly | Sensor check and track wipe | Confirm solid green and amber LEDs, remove debris, wipe tracks dry | Adjust brackets if LEDs flicker, inspect low voltage wires |
| Quarterly | Door balance hand test | Release trolley with door down, lift halfway, let go carefully | If it drops or shoots up, stop and call a pro |
| Every 6 months | Lubricate metal rollers and hinges | Use silicone or white lithium, small amount | Avoid the belt, wipe excess |
| Annually | Travel and force tune up, hardware check | Verify smooth stops, snug header bracket and rail bolts | Listen for new noises, tiny changes matter |
| Battery as needed | Remote and keypad batteries | Replace on first sign of weak range or dim lights | Reprogram after battery change if needed |
- Start, unplug the opener for 2 minutes, plug back in, test the wall control.
- Door still refuses, check the outlet with a phone charger or lamp. If dead, reset the breaker or GFCI.
- Lights flash or it reverses, clean and align safety sensors until both LEDs are solid.
- Disconnect the door using the red handle, move door by hand. If stiff, fix door issues first.
- Set travel limits, then fine tune force in tiny steps until stops are smooth.
- Reprogram remotes and keypad with the learn button. Check that lock mode is off.
- Read the blink code on the opener, look up your model chart, follow the targeted fix.
- Still inconsistent, inspect belt or chain tension, header bracket, and trolley hardware.
- App problems only, redo myQ Wi Fi setup and replace the Smart Garage door sensor battery if used.
- Unsafe or unresolved, schedule a professional inspection.
On sensor alignment, extra nuance that saves time
A few small observations from the field. Sensors can be aligned beautifully and still misbehave if the bracket is slightly loose. After you get a solid LED, gently tap the track and see if the LED flickers. If yes, snug the bracket carefully. Also look for bright sunlight blasting one sensor in the late afternoon. A small shade, even stiff cardboard for testing, can confirm if glare is the real culprit. People sometimes spend an hour on wiring when the sun is the only issue that day. Not every problem needs a tool, sometimes it needs a tiny hood.
If you do run new sensor wire, follow the original path neatly. Avoid sharp staples. Gentle cable clips save you from future nicked insulation. It looks better as well.
You can sprinkle these throughout the article or use them as callouts. They are short, specific, and use natural phrasing.
Quick win, remote dead
Replace the coin cell, then relearn the remote. If range is still poor, swap out any suspicious LED bulbs near the opener.
Quick win, door reverses near the floor
Shorten down travel a tiny bit, then add a touch of down force. Stop when the door lands, seals, and stays put.
Quick win, app says open but door is closed
Replace the Smart Garage sensor battery and redo Wi Fi setup using the 2.4 GHz network. Confirm the app completes the handoff.
Quick win, noisy start stop thump
Tighten the header bracket lag screws and the rail fasteners. Recheck travel stops.
These blocks help AI overviews extract concise answers while still sounding like a person who has actually fixed a sticky garage door at 9 pm, a little tired but methodical.
| Symptom | Probable Cause | Action |
|---|---|---|
| Lights flash, door will not close | Sensor misalignment or wiring fault | Clean, align to steady LEDs, reterminate damaged wires |
| Remote weak range | Low battery, interference, lock mode | Replace battery, toggle lock off, reprogram remote, test bulbs for interference |
| Stops short at the top | Open travel set too low | Increase up travel in small steps, retest |
| Closes then pops open an inch | Down travel long or down force too low | Shorten down travel slightly or add a touch of down force |
| Unit hums, door does not move | Jammed door, capacitor or motor issue | Release trolley, test door by hand, if smooth, schedule diagnosis |
Final safety reminders
Never adjust torsion springs yourself. If you see a broken spring, do not run the opener, it can damage the motor or rail. Keep children clear during tests. Use a sturdy ladder, not a chair. If the opener or rail looks bent after a bumper tap, stop and inspect before operating.
Troubleshooting a Chamberlain opener is rarely a single big mystery. It is a short series of small truths. Power is either there or not. Sensors are aligned or not. The door is balanced or not. Most fixes follow from these few checks. I think the most human part of the process is noticing what changed. New noise. New sunlight angle in summer. A recent bulb swap. Small details tell you where to look first.
If you want a hand, we can take it from here. Try our garage door repair for hardware issues, garage door opener installation for programming and replacements, or bundle everything with garage door maintenance. If it is urgent, use emergency garage door repair, and a technician will secure the door safely before any further work.