o manually open a garage door during a power outage, locate the red emergency release cord hanging from the ceiling track and pull it down to detach the door from the automatic opener. Then, lift the door by hand, making sure to lift evenly and keep your hands on the sides of the bottom edge. Once power is restored, you can re engage the door by pulling the release cord again to connect it to the motor. I know, that sounds simple, and it often is. Still, there are small details that matter for safety and for your sanity, especially if the door feels heavier than you expect or if the opener model behaves a little differently than the video you watched last year.
I have opened plenty of doors this way, sometimes in a hurry with melting groceries sitting in the trunk. Perhaps you have too. The process is not difficult, but a tiny misstep, like pulling the cord at the wrong angle, can make the trolley refuse to re connect later. Below is a careful walkthrough with a natural rhythm, not a stiff checklist. I will point out where you might hesitate, what you might double check, and when to stop and call a pro if something feels off.
Before we get into the steps, a quick caution. If your door is out of balance or if a spring has failed, the door can slam down or refuse to budge. That is the moment to pause. I think it is better to be a little cautious and slightly redundant with safety than to pretend every garage door behaves perfectly.
Why this guide
Power cuts happen in Ontario winters and on stormy summer afternoons. If you live in Toronto, Ottawa, or nearby towns, you probably know the feeling. You need the car, the opener is unresponsive, and you want a straightforward, human friendly method that matches how real people move through a garage, not just what a manual says.
Step 1: Disengage the door
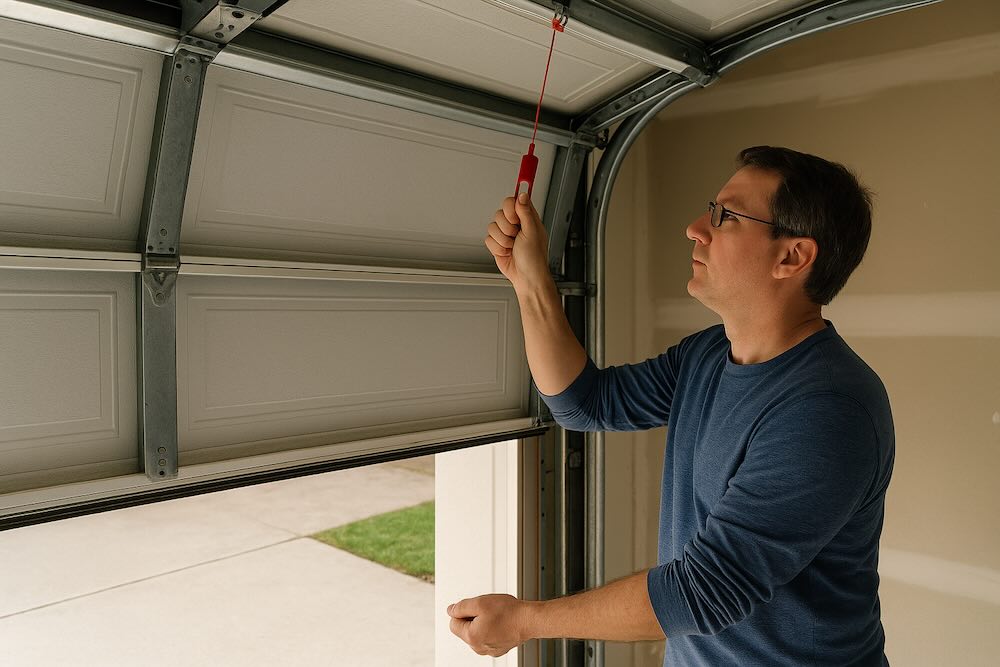
Find the emergency release cord
Look for a red rope or handle that hangs from the opener’s trolley, the small carriage that rides along the rail. It is usually in the middle section of the track, not at the motor head and not at the header above the door. Sometimes it hides behind the opener rail when the door is fully closed, so take a second and lean in for a better look.
Pull the cord straight down
Gently but firmly pull the cord straight down to disconnect the trolley from the opener arm. Straight down is important. If you yank it sideways, the latch might not release cleanly. You might hear a click. If you do not, pull again, but still straight down. Once disengaged, the opener should be free from the door, which means the door can move by hand. I like to test by lightly lifting the door an inch. If it moves without the motor trying to grab, you did it.
A tiny note. Some openers need the cord pulled down and then back toward the door to fully release. If your handle has a little arrow or printed icon, follow that. If it does not, stick with straight down first.
Step 2: Open the door
Clear the area
Make sure kids, pets, and anything on wheels are not in the swing path. A rolling bicycle or a loose basketball can slide under and complicate what should be a calm motion.
Lift with both hands on the bottom edge
Place both hands near the bottom corners of the door and lift evenly. Treat it like a heavy piece of furniture. Avoid pulling from one side only. A balanced door should feel moderately heavy but manageable. If you have to strain or if the door fights back with a gritty sound, pause.
If the door feels very heavy
That heaviness could indicate a broken torsion or extension spring. Springs provide counterbalance. Without them, the door’s real weight becomes apparent, and it is not kind to backs or fingers. If you suspect a broken spring, do not force it. Consider professional help right away. For Greater Toronto Area or Ottawa, you can request same day support here:
• Emergency Garage Door Service
Prop it if needed
If the door tends to settle downward, wedge a sturdy prop on each side or use locking pliers clamped gently to the vertical tracks just below a roller. This is a temporary hold so you can access the car or the breaker panel. Do not leave the door propped for long periods. Weather and vibration can shift things.
Step 3: Re engage the opener
Restore power and re connect the trolley
Once the power returns, walk to the opener. Pull the red cord toward the opener or follow the re engage direction on your specific model. In many cases, simply close the door by hand until the trolley and carriage meet, then press the wall button once. The opener will pull the trolley back into place automatically. If it fails to latch, press the remote to run a full cycle. You should feel the re connection snap into place.
Cycle the door fully
Run the door up and down once to make sure the travel limits and force settings are still correct. If the door stops short or slams a little at the end, you may need to reset limits using the motor’s adjustment dials or buttons. A quick tune like that can spare the opener from straining.
Common scenarios and what to do
| Situation | What you will notice | What to try first | When to stop and call |
|---|---|---|---|
| Door will not budge after release | Feels like 100 kg, no give | Check for broken spring above the door, look for a gap in the coil | Any spring issue, unusual bang sound, visible cable slack |
| Door drifts down after you lift | Slow slide toward the floor | Use locking pliers on tracks under a roller as a safe stop | Persistent drift, door feels out of balance even when propped |
| Opener will not re engage | Trolley does not catch the carriage | Close door fully by hand, press wall button once to auto latch | Grinding, repeated slipping, carriage damage |
| Wall button lights but remote is dead | Remote LED dim or off | Replace remote battery, re program if needed | Wall control shows “lock,” opener stuck in vacation mode |
Troubleshooting after you re engage the opener
You pulled the red cord back toward the opener, the trolley met the carriage, the motor hummed. In a perfect world the door glides up and down like a well rehearsed routine. In real garages, small snags appear. Nothing dramatic. Just little clues.
The door stops half way and reverses
That reversal is usually the opener’s safety system reacting to excess force or a blocked sensor. First, check the tracks for small debris. A screw on the floor, a dry leaf stuck at a hinge, even a misaligned hinge pin can trigger resistance. Wipe the tracks with a clean cloth, no grease needed. Next, look at the photo eyes near the bottom of the vertical tracks.
The motor runs but the door does not move
If you hear the opener but the door sits still, the trolley likely did not latch. Close the door fully by hand so the trolley is at the natural closed stop. Press the wall button once. You should see the carriage pull forward and click into the trolley. If the chain or belt moves but the door arm is loose, check the clevis pin and cotter pin that link the arm to the door bracket. Sometimes that pin works itself out, especially after a forceful manual lift.
The remote works, the wall button does not
Look for a “lock” or “vacation” light on the wall console. On many models, holding the lock button for a few seconds toggles the setting. If you see no lock indicator, confirm the low voltage wires at the motor head are secure. Wires sometimes get tugged while moving ladders or storage bins.
Photo eye reset, quick and calm
Photo eyes are tiny, but they decide whether the door will close. During an outage or after manual operation, they can go slightly out of alignment. The fix is simple.
Clear any obstruction
Boxes, brooms, pet beds, even a glint of sunlight across the beam, can interrupt the signal.
Check the indicator LEDs
Most brands place a steady green on one side and a steady amber on the other when aligned. A blinking light means misalignment or dirt.
Clean the lenses
A microfiber cloth is plenty. No harsh sprays. Dust can mimic a blockage.
Align gently
Loosen the wing nut on the sensor bracket, rotate the eye until both LEDs turn steady, then retighten. Try to keep both eyes at the same height, roughly 6 inches above the floor.
Test the reversal
Close the door with the remote while you wave a cardboard piece through the beam. The door should reverse on cue. If it does not, or if the eyes will not stabilize, the low voltage wire might be nicked. That is a good time to bring in a technician.
Door balance test, a two minute diagnostic
Even after you have opened and closed the door manually, it is worth confirming balance. Perhaps the outage hid a developing spring issue. Perhaps the last cold snap shrank the metal enough to change the feel.
Disconnect the opener again
Pull the red cord straight down with the door fully closed.
Lift to waist height
Raise the door to about halfway and stop. Let go carefully.
Watch for movement
A balanced door holds position or drifts an inch or two. If it slides down quickly or shoots up, the counterbalance is off. Downward drift suggests weak springs. Upward float suggests too much tension. Either way, this is not a DIY spring adjustment moment. Springs are under high load. Call a pro if the drift is significant.
Reconnect and retest
Re engage the opener and run one full cycle. If the opener strains or chatters, that is another sign of poor balance.
Travel limits and force settings, light tuning only
Openers keep memory of how far to travel and how much force is allowed before they stop. Outages do not usually erase these, but manual operation can nudge them if the trolley re latched at an odd spot.
Adjust travel limits
Look for up and down limit dials or buttons on the motor head. Move in small increments, then run a full open or full close to test. The door should land gently on the floor, compressing the bottom seal slightly, not crushing it. At the top, the door should tuck just under the header and stop without banging.
Adjust force settings carefully
Force is not a power boost, it is a safety cap. If you dial force too high, the opener might push through a real obstruction. If you dial too low, light friction can trigger reversals. Start with the manufacturer’s default. Only increase by a quarter turn or a single step at a time. Test with the door empty of cars and people.
| Opener type | Common feel | Manual release quirk | Re engage tip |
|---|---|---|---|
| Chain drive | Audible, durable | Sometimes needs a firmer cord pull to drop the latch | Close the door fully, tap wall button once for auto catch |
| Belt drive | Quieter, smoother | Soft start can mask a failed latch, watch the belt closely | Press remote while guiding trolley by hand to the carriage |
| Screw drive | Strong, steady | Release lever may face the door, not the floor | Cycle once after power returns to resync travel |
| Wall mount, jackshaft | Very quiet, side mounted | Release is at the door arm, not overhead | Ensure torsion lock is off before re engaging |
Preventive habits that make next time easy
Little habits remove friction when the lights go out.
Keep a small flashlight on a hook near the entry door, not inside a drawer.
Test the manual release twice a year. Just a quick pull and re latch.
Listen to the door. A new grinding note often means a dry roller or a loose hinge.
Replace remote batteries every 12 to 18 months. Cheap insurance.
Wipe the photo eyes during seasonal cleanups. Dust loves corners.
If you notice frayed lift cables, cracked hinges, bent track, or rollers that have lost their bearings, pause and get help. In the GTA or Ottawa, same day visits are common. You already have the links in the first half of this guide, no need to chase more.
FAQs
Can I pull the red cord while the door is open
Yes, but the door may fall if it is out of balance. If you must, brace the door with locking pliers on the tracks before releasing. Better to disengage when the door is closed.
How heavy is a typical double garage door
Insulated steel double doors can weigh 150 to 200 pounds, sometimes more. With healthy springs, it should feel much lighter. If it feels like the real weight, stop.
Do I need to unplug the opener during an outage
You do not have to. Most openers ride out outages fine. If the power flickers rapidly, unplugging can prevent nuisance surges. A small surge protector helps.
Why does sunlight make my door reverse
Strong low angle sunlight can flood a photo eye, which looks like a constant beam break. Shade the sensor slightly, realign, or use a sun shield accessory.
Is it safe to lubricate the tracks
Do not grease the tracks. Wipe them clean. Lubricate hinges, springs, and rollers with a light garage door specific lubricant. A few drops go a long way.
How often should springs be replaced
Cycle life varies. A common residential spring lasts 10,000 cycles, which could be 7 to 10 years for a busy household. If you hear a loud snap and the door will not lift, the spring likely failed.
| Symptom | Likely cause | At home fix | Risk level |
|---|---|---|---|
| Door reverses near the floor | Down travel set too low, photo eyes misaligned | Increase down travel slightly, realign sensors, retest | Low |
| Motor hums, chain or belt does not move | Carriage not latched, stripped drive gear on older units | Relatch trolley, if still no movement, schedule service | Medium |
| Door slams shut after manual lift | Spring failure, cable slack | Do not operate, secure the door, call a professional | High |
| Remotes dead, wall console works | Dead batteries, opener in lock mode | Replace batteries, disable lock on wall console | Low |
| Squeal or grinding while moving | Dry rollers, loose hinge bolts, misaligned track | Light lubrication for rollers, tighten hardware, minor track realignments only | Medium |
Weather swings in Toronto, Mississauga, and Ottawa push metal around. Cold mornings can contract springs slightly, which makes a tired spring feel weaker. Summer humidity can swell wooden door sections, adding friction at the jambs. If you hear rubbing at the sides, check the weatherstripping. Trim a swollen flap, do not pull the track inward. Track moves change geometry. Small trims are safer than big adjustments.
Also, brief neighborhood outages sometimes trip GFCI outlets that feed the opener. If your opener is silent after power returns, look for a tripped GFCI in the garage, laundry room, or even an outdoor receptacle. Reset, then test. It is a quick win that people overlook.
Final safety and maintenance loop
Test the auto reversal monthly. Place a 2 by 4 under the door and close it. The door should reverse on contact.
Keep fingers away from section joints. Pinch injuries are common during manual lifts.
Replace worn nylon rollers if the bearings wobble. Small upgrade, big noise reduction.
Consider a battery backup opener if outages are common. It keeps the door moving without manual release at all.
I think a little caution pays off. The system is simple, but it is heavy. Trust your instincts. If something feels wrong, it probably is.